
Introduction – What is a turntable plinth?
The “plinth” is a word that’s gained popularity only recently. Originally, a “plinth” was used to describe a construction in architecture which was used as a base on which several other components should be placed (atop).
The turntable plinth is actually a turntable base, and there are several reasons for the substitution of the name:
- Some people confused the word base with “bass”
While most audiophiles and people who really love record players can’t make this kind of a mistake, regular people could find themselves in a confusion – the “base” and “bass” actually sound pretty much the same.
Record player’s function is audio playback (read here how a record player works), and it would only be natural that, at some point, someone mentions the record player soundstage.
- A turntable base can also refer to the entire turntable design and construction, or the material underneath the record player
Some people label things as they see fit – the base of a turntable could easily be a wooden plank that supports its stability, it could be the entire record player, or it could be something else entirely. The main reason for changing the name is because the “original word” wasn’t enough specific.
- It’s easier to distinguish from the rest of the components
The functions of a turntable plinth
A turntable plinth serves two functions – the first is concerned with practicality, and the second is concerned with aesthetics.
- Holding all of the pieces together – practicality
Most record player models feature a manifold of small electronic parts that can be easily damaged if they’re not guarded. The primary function of a turntable plinth addresses this matter – it provides a storage compartment for these small parts so that the risk of them being damaged is minimized.
- Looking good is also one of the functions of a turntable plinth – aesthetics
The first thing that we notice on good looking record players is their design and outward appearance, but most people don’t know that it’s actually the plinth that catches our attention. The base takes up most of the turntable’s design, so if it’s well-built – we will like it more, and vice versa. It’s imperative that the durability doesn’t suffer for the aesthetics, though.
Can turntable plinth be bought separately?
There are several answers to this question. Here’s the deal, if you want to build your own record player, you should either buy or make your own plinth. If you already have the electronic parts, you should definitely buy a turntable plinth as well, but there’s a certain case in which you can’t purchase it separately – when the electronics are permanently affixed to the construction.
You might be asking yourself – “Why can’t I purchase a turntable plinth separately in this case?”
The answer is simple – there’s a great chance that you will destroy or damage the electronics that are housed inside the turntable’s base. Here’s the breaker – you could buy a separate turntable plinth in this case, but you wouldn’t be able to do anything with it if you lack the knowledge to properly dismantle the electronic components and put them back together.
Can you make it yourself?
Sure, with a little know-how you could make a turntable plinth yourself. This isn’t a trivial task, though – you will definitely need a lot of time and effort, you will need specific tools, and a lot of optimism. Now, it’s almost definite that your first hand-made turntable plinth won’t cut it, but you should not be discouraged – after a couple of tries you will get the hang of it.
You might be asking – “Why should I even consider making it myself when I can buy it?”
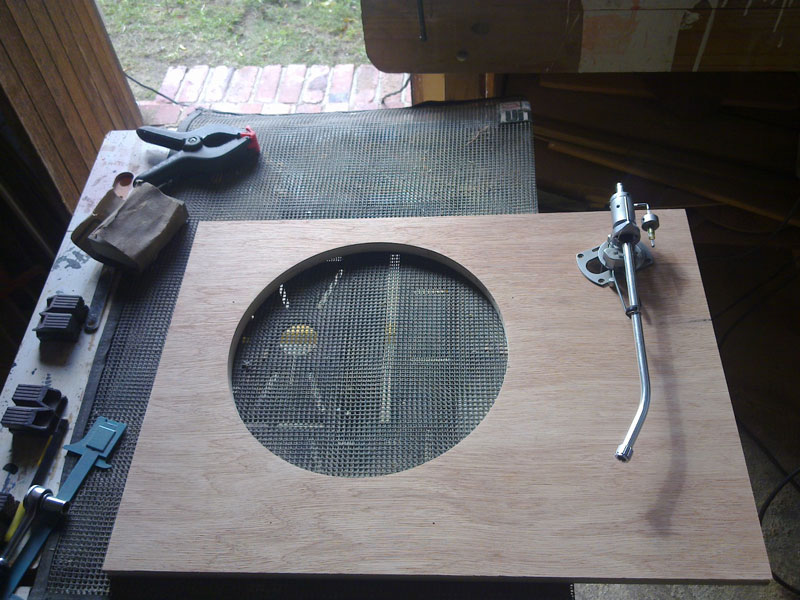
It’s fun, and it will save you a lot of cash. Now, we’ve already mentioned that it won’t be easy, but we’re here for you. We’ve compiled a list of several easy steps on “How to create your own turntable plinth”:
- Gather up the necessary supplies
You will need specific supplies – a couple of wooden planks (it’s up to you which material – rose nut, eucalyptus, etc.), a cutting tool, a sanding tool, some wood glue, some screws, a screw-gun, and the measuring tape.
- Take all the measurements you need – you only need to determine the measurements of a single layer of the plinth. Afterward, you could easily cut out more and simply stack and glue them.
- Cut the wood to the measurements you’ve previously determined
- Attach the parts with a screw-gun and the wood glue;
- Paint and finish
Turntables with special plinth design
Music Hall MMF 9.3 Turntable with 1-piece Carbon-Fiber Tonearm – Triple-Plinth
Music Hall’s MMF 9.3 has a unique plinth design – it features a triple-plinth construction. A triple plinth construction increases the stability and durability of this turntable, but it also looks absolutely ravishing.
The only downfall of this base construction type is that it adds weight as well. Anyway, this won’t be a problem once you’ve setup your turntable.

Music Hall Ikura Split-Plinth Design Belt-Driven Turntable
Ikura is (by far) a turntable model that made “split-plinth design” famous. Music Hall got much renown by implementing the exquisite types of design, and the “split-plinth” was one of their greatest inventions.
It simply adds to the appeal of the turntable, leaving everything else as it is. Which makes for a very good looking product overall.

Rega Planar P1 Turntable
Rega Planar P1 features a single plinth-design which is pretty common, but the curious thing about it is that is has a double-finish design.
The manufacturers of this magnificent turntable grazed, sanded, and lacquered this model several times to that the surface of the plinth is durable, stable and good-looking.